User’s manual
All puzzles have the same operating concept, even if not all functions are available in all puzzles The supported functions are briefly described in the individual games and puzzles, while this manual is much more detailed.
Changing cells
The major difference between the individual puzzle scripts is how to change cells or draw lines. All mechanisms are described here, but not all of them are available in all scripts.
With the mouse:
- Click on a cell repeatedly with the left mouse button until the desired value is displayed, e.g., black-white-neutral or circle-cross-empty.
- Right-click on a cell and select a value from the drop-down menu. “•” deletes the cell. See also Entering multi-digit numbers.
- Point to a cell with the mouse pointer and copy the value of the cell to neighbouring cells (also diagonally) by holding down the left mouse button and dragging.
With your finger:
- Tap a cell repeatedly until the desired value is displayed, e.g., black-white-neutral or circle-cross-empty.
- Tap on a cell and select a value from the drop-down menu. “x” deletes the cell. For some puzzle types, a short tap is enough; for others, the menu is only displayed when the finger holds on the cell for longer. See also Entering multi-digit numbers.
- Touch a cell with your finger and copy the value of the cell by dragging it to neighbouring cells (also diagonally).
Using the keyboard:
- Use the Arrow keys to move the selection frame to a cell and repeatedly press Enter or Spacebar until the desired value is displayed, e.g., black-white-neutral or circle-cross-space.
- Use the arrow keys to move the selection frame to a cell and change the value directly using the keyboard. The keyboard layout is indicated for the individual puzzle types. Backspace and Del delete a cell.
- Multi-digit numbers are entered by quickly entering the digits of the number; a longer pause ends the number entry. Example: 1-3-5 leads to 135, 1-3-(pause)-5 leads to 5.
- Use the Arrow keys to move the selection frame to a cell and copy the value of the cell to neighbouring cells by holding down Shift.
Tips:
Move the mouse pointer over a cell (do not click!) and select the value directly with the keyboard, as described above.
The selection frame is only displayed when you work with the keyboard, i.e., after pressing one of the arrow keys.
The puzzle remembers the last value entered and applies it again and again until another value is selected. This is based on the general idea that it is more likely to enter the same value in several cells in succession than different values.
Example Snake: If you click on a neutral cell, it will be coloured black. If you now click on other non-black cells, these will also be coloured black. If you now also click on a black cell, it will be coloured white. Further clicks on non-white cells will colour them white.
Colouring cells
For example Nurikabe, Nonogramme, Kuromasu.
With the mouse:
- Click repeatedly on a cell until it takes on the desired colour: white, neutral, or black.
- Point to a cell with the mouse pointer and copy the colour of the cell to adjacent cells (also diagonally) by holding down the left mouse button and dragging.
With your finger:
- Tap a cell repeatedly until it takes on the desired colour: white, neutral, or black.
- Touch a cell with one finger and move your finger to a neighbouring cell. The colour of the source cell is copied to the target cell.
Using the keyboard:
- Use the Arrow keys to move the selection frame to a cell, and repeatedly press Enter or Spacebar until the cell takes on the desired colour: white, neutral, or black. The selection frame is only displayed after pressing an Arrow key and disappears again when you work with the mouse.
- You can use the following keys to select the desired colour directly:
| Colour | Key |
|---|---|
| Black | A, X, ,, Insert |
| White | S, C, . |
| Neutral | D, V, -, Del. Backspace |
- The schemes A–S–D or X–C–V are based on the arrangement of the keys, the other keys are chosen mnemonically.
- Use the Arrow keys to move the selection frame to a cell, and hold down Shift to copy the colour of the cell to neighbouring cells.
Drawing lines through the cells
For example: Arukone, Country Road, Masyu, Yajilin.
With the mouse:
- Point to the cell where you want the line to start, and move the mouse pointer over the grid while holding down the left mouse button. The line will follow the movement of the mouse pointer.
- Move the mouse pointer over the grid while holding down the left mouse button and Ctrl. All cells over which the mouse pointer moves are deleted.
With your finger:
- Touch a cell with one finger and move your finger across the screen. The line will follow the movement of your finger.
Using the keyboard:
- Use the Arrow keys to move the selection frame to the cell where you want the line string to start, then press Shift and move the selection frame over the grid. The line will follow the movement of the selection frame.
- Use the Arrow keys to move the selection frame across the grid while holding down Shift and Ctrl. All cells through which the selection frame moves are deleted.
- The Backspace and Delete keys delete a cell.
Drawing rectangular areas
For example: Sikaku, Rekuto, Kapetto.
With the mouse:
- Point to a corner cell, press the left mouse button, move the mouse pointer to the opposite corner cell and release the mouse button.
- Click on any corner cell and then on the diagonally opposite corner cell.
With your finger:
- Touch a corner cell and move your finger to the diagonally opposite corner cell.
- Tap any corner cell and then tap the diagonally opposite corner cell.
Using the keyboard:
- Use the Arrow keys to move the selection frame to a corner cell and select it with Enter or Spacebar. Now move the selection frame to the opposite corner cell and press Enter or Spacebar again.
Drawing lines on the grid
For example: Renkatsu, Slitherlink
With the mouse:
- Click repeatedly on a grid line until it takes on the desired appearance: Borderline, no line or a cross, grid line.
- Point to a line with the mouse pointer and copy it to other lines by holding down the left mouse button and dragging.
With your finger:
- Tap a grid line repeatedly until it takes on the desired form: Borderline, no line or a cross, grid line.
- Touch a line and move your finger across the grid. All lines that you move your finger over will take on the form of the line you touched first.
- For puzzle types where you can work with both cells and lines (there are almost all of them), you have to switch between cell tapping and line tapping, as one finger is too inaccurate to hit the desired item with certainty. This is done by tapping on the value icon.
Using the keyboard:
In many similar puzzles, drawing lines using the keyboard is not possible.
Dropdown menu
The dropdown menu is used to enter numbers, markers and colours.
- Mouse: The dropdown menu is displayed when you click on a cell or one of the buttons to select the colour, marker or value. For puzzle types with many possible values, a left-click is required; for puzzle types with few values, a right-click is required.
- Finger: The dropdown menu is displayed when you tap on a cell or one of the buttons to select the colour, marker or value. For puzzle types with many possible values, a short tap is required; for puzzle types with few values, a long tap is required.
- Keyboard: The dropdown menu is displayed with Alt+Enter or Alt+Spacebar after you have moved the selection frame to a cell with the Arrow keys.
The dropdown menu has three tabs: Values, Colours, Markers. Depending on how it was called up, a specific tab is displayed; however, you can activate another tab at any time by selecting it.
Values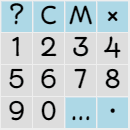 | Colours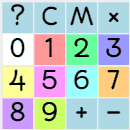 | Markers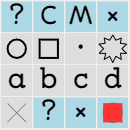 |
First line: “?” selects the values, “C” the colours, “M” the markers,, and “x” closes the dropdown menu, as does the Esc key.
Value menu: Normally, after tapping or clicking on a value, it is accepted immediately. [🅇] deletes the cell. […] switches between entering single-digit and multi-digit numbers. Multi-digit numbers are entered by clicking or tapping on the individual digits; the current number is displayed in the cell at the bottom right; tapping or clicking on this cell transfers the displayed number to the grid.
Colour menu: [+] accepts all values marked with the current colour; [-] deletes all values marked with the current colour.
Effects: Depending on how the dropdown menu was called up, a selection has different effects:
If you select a marker in the toolbar, all subsequently clicked cells are marked with the selected marker; the current colour and current value are ignored.
If you select a colour in the toolbar, all subsequent entries of values are marked with the colour.
If you select a value, a colour or a selection for a specific cell, only the selected cell will be changed.
Candidate lists
For complex tasks, it often makes sense to note in a cell itself which values it can (or cannot) assume. This looks like this, for example:![]() The cell can take the values 1, 2, 6, 9 and X, but not the values 3, 4, 5, 7 and 8, which have already been excluded due to logical considerations.
The cell can take the values 1, 2, 6, 9 and X, but not the values 3, 4, 5, 7 and 8, which have already been excluded due to logical considerations.
![]() or F7 switches the candidate mode on or off again. In candidate mode, the icon is highlighted in colour.
or F7 switches the candidate mode on or off again. In candidate mode, the icon is highlighted in colour.
In candidate mode, the list of possible values for a cell can be edited. If a value already exists in the list and is entered again, the value is deleted from the list. Example: After entering 1-3-5-5-4-1, the value list consists of the values 3 and 4.![]() Right-click on
Right-click on ![]() or
or ![]() hold – сandidates are automatically generated (not in all puzzles).
hold – сandidates are automatically generated (not in all puzzles).
Candidate lists, symbol and colour markers are independent of each other; however, the parallel use of candidate lists and symbol markers is not exactly clear.
Tip: With the usual size of a script embedded in a page, the markers are very small. In this case, it helps to enlarge the grid, see Enlarging and reducing the puzzle.
Symbol marking
Symbol marking make it easier for you to solve tasks. The meaning of the symbols is not specified; it is up to you what you use the symbol markers for.
A total of nine symbols are available:
The specified keys set the corresponding symbol marker or remove it again if the symbol marker was already set.
In puzzles where the letter keys have no other function, you can also dispense with Ctrl; for example, you can simply use Q instead of Ctrl+Q.
Candidate lists, symbol and colour markers are independent of each other; however, the simultaneous use of candidate lists and symbol markers is not exactly clear.
Colour marking
Colour marking make it easier for you to solve puzzles. The meaning of the colours is not fixed; it is up to you what you use the colour markers for (for example, you can use them to indicate cells that belong together or intended moves).
A total of ten different colours are available, which you can select as follows:
- Mouse: Select a colour from the colour selection menu.
- Finger: Select a colour from the colour selection menu.
- Keyboard: Alt+0 = Standard (usually black or white), Alt+1 = Red, Alt+2 = Green, Alt+3 = Blue, Alt+4 = Yellow, Alt+5 = Magenta, Alt+6 = Cyan, Alt+7 = Orange, Alt+8 = Violet and Alt+9 = Lemon.
If you then change an element (cell, line, area), it automatically takes on the currently set colour.
However, you can also colour an individual element without changing its value; this even works for cells with predefined values that cannot be changed:
- Mouse: Ctrl+left-click colours the clicked cell with the set colour.
- Keyboard: Ctrl+Enter colours the cell with the selection frame with the set colour.
In puzzle where the number keys have no other function, you can dispense with Ctrl and simply colour a field with the corresponding number key; for example, “3” then colours the current cell blue.
Elements marked in colour can be quickly decoloured or deleted if required. First select a colour and then :
- F8 or “+” in the colour selection menu or decolours all cells of the currently set colour; the values are retained
- F9 or”-” in the colour selection menu or decolours all cells of the currently set colour and at the same time deletes all content coloured with the current colour.
Line markings
Left-click on a grid line to change its display (borderline, grid line, no line).
Error markers
If you have solved the task correctly, the colour of the frame around the grid automatically changes to green.
Do you think you have solved the task, but the frame colour does not change to green?
- All errors are marked with
 or with the F6.
 - Of course, a script has no way of knowing where you have made a mistake; it only determines which rule has been violated. Common error markers are:
- Letters, numbers, symbols or backgrounds are shown in red.
- Letters, numbers or symbols are marked with a red circle or a red square.
- A cell is marked with a red dot.
- A line is shown in red.
- If there is a rule of coherence, for example, that all black cells or all lines must be connected, then the individual sub-areas are displayed in different colours.
Cancelling and restoring moves
Moves can be cancelled or cancelled moves can be restored:![]() or Home cancels all moves.
or Home cancels all moves.![]() PgDn or Ctrl+Z cancels a move.
PgDn or Ctrl+Z cancels a move.![]() PgUp or Ctrl+Y restores a cancelled move.
PgUp or Ctrl+Y restores a cancelled move.![]() or End restores all cancelled moves.
or End restores all cancelled moves.
It is also possible to cancel and restore moves several times in succession; this allows you to cancel or restore entire move sequences.
If you hold the ![]() or
or ![]() icon, moves are cancelled or restored until you end the hold.
icon, moves are cancelled or restored until you end the hold.
Restoring is only possible immediately after cancelling. If you have cancelled several moves and then made another move, you can no longer restore cancelled moves.
Saving and restoring games
You can save the current status of a game and restore it later:![]() or Ctrl+S saves the current saved game.
or Ctrl+S saves the current saved game.![]() or Ctrl+L loads a previously saved game.
or Ctrl+L loads a previously saved game.
There are 9 storage locations available:
- The first storage location (“Local”) is on your web browser; a gamesaved there survives for 10 days. For this to work, the browser must be configured to accept permanent cookies from this site. A cookie remains stored for 10 days and is then automatically deleted by your browser.
- The other 8 memory locations (“Session”) only exist internally, i.e. their content is lost when the browser window is closed. Memory locations in blue text are occupied but can be overwritten; memory locations in black text are not occupied.
Left-click or tap on one of the icons: A dropdown menu is displayed in which you can select one of the memory locations.
WARNING!
If you delete the cookies from this site, you will also lose all saved games stored in your browser!
Showing the correct value of a cell
If the solution is known, you can query the correct value of a cell if you cannot find a continuation:
- Use
 or F3 to switch the hint mode on and off again. In hint mode, the icon is highlighted in colour.
To enter the correct value in a cell, switch the hint mode on and off.
- Mouse click (tap) on a cell.
- Use the arrow keys to move the selection frame to a cell, then pess Enter or Ins.
Showing solution
You can display the solution to the puzzle with ![]() or with F4. The icon is only displayed if the solution is known.
or with F4. The icon is only displayed if the solution is known.
If the solution moves is also known, ![]() is highlighted in colour. You can load these moves into the move list by twice clicking on
is highlighted in colour. You can load these moves into the move list by twice clicking on ![]() or pressing F4.
or pressing F4.
You can scroll through it with ![]() ,
, ![]() ,
, ![]() and
and ![]() .
.
WARNING!
If you load the solution moves into the move list, all your previous moves will be irrevocably lost!
Enlarging/Reducing the puzzle
There are various methods for enlarging or reducing the grid:
 Left-click with the mouse or tap with your finger: A dropdown menu is displayed. A number indicates the size of a cell in pixels; if “auto” is selected, the grid adapts to the window size.
- Right-click with the mouse or hold with your finger: “auto” is automatically selected without the dropdown menu being displayed. The grid is also positioned in the window so that it is fully visible.
- Keyboard: Press Ctrl and use the Arrow keys to zoom in/out of the grid (up/right: zoom in, down/left: zoom out).
- Mouse: Move the mouse pointer over the grid while holding down the left mouse button and Ctrl. Moving to the right/down enlarges and moving to the left/up reduces the diagram.
- Finger: Drag with two fingers; the grid size follows the distance between the two fingers.
Note: The grid can never be larger than the screen or window; parts of the grid may be cut off and you will have to move the grid within the window to see the missing parts.
Tip: With most browsers, you can switch to a full-screen mode with F11 or a menu command (e.g. View, Full Screen), in which many control elements are hidden and the area available to the puzzle is maximised.
Moving the puzzle:
If the grid is larger than the visible area on the screen, you can move the grid within the visible area.
- Mouse: Use the scrollbars.
- Finger: Touch the grid with two fingers and move them to the left, right, up, or down. The grid follows the finger movement. (One-finger movements are reserved for drawing lines or copying values to neighbouring cells).
- Keyboard: Press Alt and move the grid to the left, right, up or down using the Arrow keys.
Note: The grid can never be moved so that one of the corners lies within the drawing area. This ensures that the drawing area is always optimally used.
Information
You can call up information about the puzzle and the script by pressing ![]() or F1.
or F1.
The ![]() button displays data about the current puzzle in a separate window, including the current score and the list of moves that led to it.
button displays data about the current puzzle in a separate window, including the current score and the list of moves that led to it.